Friday, July 15, 2011

Coastal Decor


I'm redoing our guest room, the former man-cave of our youngest son.  Since many of our guests don't live near the ocean, I decided to give the room a full-on beach-y feel.  I'm not usually a fan of "theme" rooms, but since we live very close to the ocean, we have the street beach-cred to pull it off. 

I found lots of inspiration at one of my favorite blogs, Completely Coastal.  This site is full of wonderful beach decor and ideas for using all those shells and beach treasures.   Then flipped through the Pottery Barn catalog for more ideas.  It's no secret that I love their ideas, but not their prices!  Like many crafty-types, I look at their stuff and my first thought is, "How cool is that" and my second is, "I can totally make that!" 


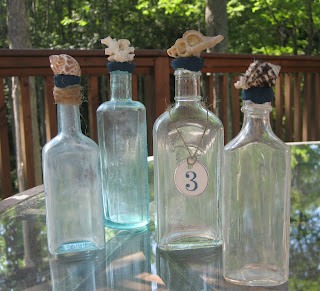
I've seen these bottles in very pricey catalogs - these are from Wisteria.  These shells are soldered on and that's beyond my capabilities, but I thought I could recreate this look.  I started out by gluing paper "caps" onto the bottle tops to avoid having the "solder" drip into the bottle.  I used grout for the solder and was glad I had the little top on - it gave a firm platform and did prevent droppings inside the bottle.  I swirled it onto the bottle top, and frankly, it looked pretty rough.  Once it dried a bit, I was able to pat it smooth and make it follow the contours of the bottle.


I painted the grout dark blue - thought the black was too harsh for my color scheme and then glued on the shells.  I couldn't resist adding a tag to one and wrapped one with twine.


Love my free shell bottles!

Next a Pottery Barn knock-off based on these lanterns from PB.  Boston Daughter bought this lantern for me and now it have been PB-ized:


I saw this somewhere and can't remember which chi-chi catalog.  This one was easy - wrapped a glass cylinder with burlap and then tied on some muslin-stamped ribbon I made.  Some sand, a candle, shells and done.


Stay turned for the big reveal!


Saturday, July 9, 2011

File Folder Tote


 New accordion file folder from the thrift store - nice enough, but  I'm constitutionally unable to leave things "unfiddled around with".  I needed something that would appeal to Boston Daughter and her more urban decor so this folder needed a serious do-over.

First I needed to find some paper - no large sheets of anything to be had locally, so I consulted my stash and found two coordinating sheets of paper.  I had planned to use just one color/pattern, but these worked with BD's chic black and white theme, so decided to try the two together.

Then, always the "what glue do I use " dilemma.  I've had too many problems with paper bubbling, not sticking, glue cracking, etc. so I'm always on the hunt for the P.E.R.F.E.C.T. adhesive.  I read an article about glue (and yes, I'm aware of how pitiful that sounds!) and had a eureka moment : There is no such things a one-glue-for -everything.  I now have a shelf of adhesives of many types - glues, tacky, glossy, quick-drying, slow-drying, glue runners, glue dots - OK, you get the idea.  One of my go-to glues is Yes Paste - available at Michael's and online.  It is a water-based glue, advertised as permanent, non-curling, non-cracking, non-bubbling and so far, it's been all of that.  The only problem I have with it is that the paste is very thick, making it hard to spread.  I have successfully watered it down a little, but adding water increases the chance of the dreaded bubbles, so I try not to add much, just enough so I can spread it more easily.  Once the paper was glued down, I used alligator clamps along all the edges to be sure the folded over edge stayed stuck down.


Here is the new folder, sporting its new cover and some tags. 


The top was tricky as I couldn't remove the hardware (well,  I COULD remove it, but putting it back would be problematic).  I pieced the flap and then cut carefully around the hardware.  I glued a strip of the dark base paper to cover the seam.  I made a few tags for decoration - the red one was from a pair of converse sneakers that I covered with red pigment ink and then  embossed with UTEE several times to get it really thick and glossy.  The other one is a vellum tag with a Chinese coin and the red safety pin from an old Gap tag.
Added some stamped labels to the files

And made little feet by cutting the shank from some opaque round buttons. 

BD loves her new organizer !

Normal Title Italic

Follow Me on Pinterest

LinkWithin

Related Posts Plugin for WordPress, Blogger...
 
SITE DESIGN BY DESIGNER BLOGS