Wednesday, September 28, 2011

Shelf Love

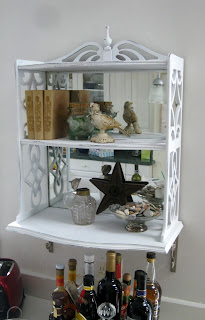
We just repainted the kitchen/dining room/upstairs hall.  We took out a useless cupboard and I decided to replace it with some shelves.  I thought about just 3 separate shelves, but then found this little beauty at one of my favorite spots for finding vintage goodies - Flukes and Finds in Newburyport, Massachusetts. 


I want to keep the kitchen light, so the black had to go. The gold trim didn't do it for me either.  I also thought about taking off the back to open it up more, but was afraid that removing the back might make the little unit unstable.  So, I decided to spray paint it white and thought I could just spray the fabric back and all would be fine.  Let me tell you that spray painting old fabric is a BAD idea - every little thread and pill (that were not that obvious to start with) became "frosted" once the spray paint hit them. 

Initiate Plan B - pull off the fabric carefully without removing the back and then spray it again.  I assumed the backing was plywood.  But, look what I found:


A mirror!   Sweet!  A mirror with some spots and a few scratches; the kind of mirror that makes a shabby chic-ster go weak in the knees.  My little shelf came with a bonus!

Lots of digging out little threads, some serious sanding, more white spray paint and then some sanding to shabby it  up a bit and my shelf fits in perfectly in its new home.


Love my new mirrored display space.  Bow to the power of spray paint and mirror magic! 


Monday, September 19, 2011

Mother-Daughter Days in California

Spent a few glorious days in Southern California.  One of the wonders of being a parent is seeing your children grow into  happy, successful adults who ask you to come and visit - yippee! 

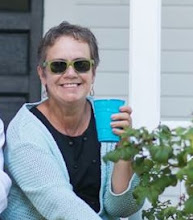
Here we are - CA daughter (holding the all-important morning joe) at Rachel Ashwell's Shabby Chic store.  I do so love me some Rachel Ashwell and did inquire about just moving in!  All that vintage white and  pink fabric and worn to a patina furniture - what's not to like?  Check out the lamp shades - old crinolines!  What a fun idea - maybe a smaller tutu shade for a little girl's room? 

I'm standing at the Palisades Park , next to these fantastic Australian tea trees (yes, these are the trees that produce tea tree oil).  Their gnarled roots grow on top of  the soil, making great root sculptures.


The Santa Monica Farmer's Market is just like our local one, that is, if our local one were on steroids!  Established in 1981, it has over 100 vendors, is open twice a week, and offers all kinds of unusual produce  along with the usual suspects.   We found some fresh French fageolet (try saying THAT 3 times!) beans and turned them into a yummy salad with a recipe from The Splendid Table.  The dragon fruit flesh looks like a dark pink kiwi and tastes like a very mild combo of kiwi and mango.  We got a lesson in selecting the best okra from a savvy shopper and made oven baked okra as a treat for southern- born son-in-law. 


I love, love, love plam trees and  desert plants.  In late summer (this is less painful for me to say than "early fall") trees and flowers are in full-on bloom, with no sign of winding down - what's not to like?  From left, artichokes going to seed,  palms,  century plant blossom, and a succulent easily 2 feet wide. 

Consistently warm temperatures without humidity or radical highs and lows, no ice or snow, gorgeous  trees and flowers, and a perfectly good alernative to the East Coast ocean - a girl could get used to this!
~~~~~~~~~~~~~~~~~~~~~~~~~~~~~~~~~~~~~~~~~~~~~~~~~~~~~~~~~~~~~~~
(Trying out the collage-making capability on Picnik, thanks to CA daughter sharing the link.  It's quick, fun, free [upgrade available for not too much $$] and easier than scrolling through all those pictures!)

Thursday, September 8, 2011

Too Much of a Good Thing is Too Much


I used to have this saying over my shelf of cookbooks:  " My collection of cookbooks far exceeds my ability to cook".   Now I'm pretty certain my collection of cookbooks exceeds at least my shelf space!  (After taking this picture, I found six more stashed somewhere else  - a sure sign of too many)!


We're painting the kitchen and that means moving everything out of the way.  When I moved the cookbooks , I was a bit amazed at size of the stack!  Really, I haven't opened some of these in years.  I've saved some because of one or two recipes, and honestly there are several in pristine condition because I've never used any of the recipes.

With so many great food blogs and recipe sites, I usually get new recipe ideas on-line. ( A few of my favorites are on my blog list to the right of this post).   If the recipe is a keeper, I send it to my recipe notebook on  OneNote.  Judging by the cookbook section at Barnes and Noble, the internet hasn't replaced print books, but I have read that e-cookbook sales are through the roof.  That makes sense - my dream kitchen would include a computer in the counter top, protected for spills (I'm a pretty messy cook). 

Here is the stack after some serious purging.  Much more manageable!  I only kept the ones I actually use - what a concept! 


I also had a stack of cooking magazines that got the boot.  I tore out the recipes I want to try, filed them in a folder, and the magazines went into the donate pile.  I'm going to make a recipe from that folder every week - if it's a keeper it'll be scanned into OneNote.  Maybe it makes sense to look into online versions of these magazines and save recipes directly from the site - skip the paper, save a tree and all that!

While this clean-out was prompted by a kitchen re-do, I've been doing some general decluttering.  I love going to estate sales, and I am amazed at how much stuff some people accumulate.  Sometimes it's just sad - I went to one sale that would have done a gift shop proud.  The old woman who lived there had over two hundred collectible dolls and enough brand-new Christmas decorations to start up her own store.  These are not hoarders of TV fame - these were clean, normal homes with just too much stuff.  Whenever I go to a sale like that, I come home and throw something away, just to be sure I don't go the the Dark Side!

I'm trying to follow the  "if one comes into the house, one like it goes out".  (This rule applies to everything except shoes, of course). 

Monday, September 5, 2011

Thrifted Cloth Napkins

"It is better to have looked and tossed than never to have looked at all."
~~  The Salvage Sisters

I always look at the linens at second hand stores, but afraid I've not been very adventurous in thinking "what else could I do with that fabric?"  Last week I found  one lonely drape panel in a great print and it dawned on me that my search for new cloth napkins was over!

First step is to wash and dry the fabric before doing any cutting.  Best to find out early about nasty habits like shrinking, fading, needing too much maintenance (like ironing).

My panel washed and dried fine, so off to cutting out the napkins.  I measured the napkins we have and decided to make mine about 12 inches x 15inches. You can make them smaller or larger, depending on your preference and how much fabric you have. Remember to allow an extra 1/2 inch all around for the hem.

I made a pattern so I didn't need to measure each one individually. Not being very good at precise measurements, this assured all the napkins would be (nearly) the same size!  Be sure to cut along the straight edge of the fabric (near the side hems) so your napkins edges are on the straight grain of the fabric.  I didn't take out the hemmed edges in case the fabric had worn a bit along that crease. 

Next, make the hemmed edge - start by turning the right side of the fabric in about 1/4 inch, then turn it in another 1/4 inch so you have a neat edge with no fabric to unravel.  Sew this hemmed edge about 1/4 inch from the edge of the hem.  I don't usually pin the hem, but if you're worried about it, pin it to make sure everything stays together as you sew.   I sew the two opposite edges first, then the other two edges.  This gives a nice little criss-cross in the corner and is much easier than mitering the corner. 

This is a simple sewing project, no special skills required.  It's a quick and easy and by using thrifted fabric, pretty darn cheap.  You could, of course, make these out of new fabric (I assume that's what normal people do)!  Either way, they'd make great gifts - add a floppy bow and a tag and you've got a thoughtful gift.  However, I am keeping mine!


As I was putting my new napkins away, these old standbys looked like they could use some spiffing up.  I used some acrylic paint to add some pattern and color.  The stamping worked better when I spread out a thin layer of paint on a paper plate and stamped into it, rather than applying the paint to the stamp with a brush.   Let the acrylic paint dry completely for a day or so, then iron (set the iron as hot as your fabric can tolerate) to permanently set the paint and make it washable.


What have you made out of thrifted fabric?

Normal Title Italic

Follow Me on Pinterest

LinkWithin

Related Posts Plugin for WordPress, Blogger...
 
SITE DESIGN BY DESIGNER BLOGS