Friday, June 29, 2012

Scotland - Highlands and the Islands


The Captain and I went to Scotland recently to research the smidge of Scottish pedigree in his family.  We knew we wanted to drive through the Highlands, visit some of the islands and gardens, and of course, see castles!  Clans and Castles is a great travel service that takes your ideas and turns them into an intinerary, complete with lodging and ferry reservations.  They planned out a great route for us - wait till you see some of the places we stayed!

We were surprised by the weather; I packed sweaters, raincoats and umbrellas and we had to buy sunscreen there!  The weather was bright, sunny and very warm.  The locals asked us to stay longer and come back often as we seemed to be a good-luck weather charm.


These stone arched bridges are everwhere and so beautiful.  They are made without any mortar and still in use - and for loads lots heavier that the horses and carts for which they were designed.  See the bright sunny day - no drizzle, no fog, nothing but bright sun.

One of the best things about traveling is the chance to learn that what you thought you knew about a country might not be quite the whole story.  Take Scottish food - what comes to mind?  Greasy, heavy, bland and made from animal parts best not mentioned?  Wrong!  We had great fresh local food , or as the natives call the local food movement "food that's accounted for".  Salmon -fresh, smoked and oh- so- tasty, "squat" lobsters - lobsters so tiny the tail was about as big as a malted milk ball, salads with micro -greens - definitely not what we expected.  And of course, whiskey!  Whiskey in porridge - now there's a treat - enough cream and sugar and even I can enjoy whiskey. 


We did indulge in fish and chips, but whimped out of having "brown sauce" on the fries!  Notice the dainty little "chip fork! 

The food was better than expected - the roads - MUCH worse!  First there's the whole driving on the left side of the road, which means going counter-clockwise around a rotary ("round about") - and there are LOTS of round-abouts!  Then there's the actual road problem, as in not enough !  Two way traffic on 3/4 of a lane!  Add in sheep wandering all over, speeding locals, and drop-offs that end in the water and you beging to see the problem.  The Captain did all of the driving and I did all of the announcing in a voice between panic and hysteria - "car coming"!  "you're too close to the edge"  "SHEEP", "Car!  CAR !!  "CAR"!!  He actually did fine - no crashes, no scrapping, just lots of hyperventilating on my part.


 Two way traffic on this narrow path road, blind corner, drop off to the loch = terror!


Lots of signs - the one on the bottom right trying to remind tourists to do what doesn't come naturally!

The best of these crazy roads - sheep, lots of cute sheep!


More coming - did I hear you groan??

Monday, June 25, 2012

Conquering the Fear of the Journal


I love the idea of journals and all the wonderful journal pages I see, but the idea of creating one is frightening - all those blank pages, what to write on them, how to decorate the pages - all of which make me verklempt!  I've accululated several potential books to use, but not the motivation.

I took Diana Trout's book, Journal Spilling, out of the library last week and have been enjoying it with my morning coffee.  She approaches what I think of as "free-form" journaling - playing with color, collage and words without any preconceived idea about where it's all going.  OK, now I'm REALLY nervous, but her enthusiasm and techniques are pretty compelling.


She keeps encouraging us NOT to think about what we're doing on the page - no dawdling or analyzing, just keep going.  This is easier than it sounds and I'm pretty sure it takes some practice .  I'm afraid that this approach might work for people who instinctively know "what works" so they don't really need to think about it.  The rest of us mere mortals might need more structure!  I'm going to work on being more spontaneous - an oxymoronic statement, for sure!

Her enthusiasm is contagious and inspiring, so  I took the plunge.  Page number 1:


I started by gluing on a piece of paper I used to try out some spray mists and ink a canvas moth .I love using cast-off papers!   I dabbed on the dots using sequin waste and Distress Inks and then colored the edges with the same inks.  A piece of swirly- mulberry paper and a strip of printed fabric added some more color.  I added a stamped art quote.


  This quote seems appropriate for my project!

Then tackled the double-page spread.  I rubbed the pages with chalk, then scribbled on some Post-it glue and rubbed a block of chalk right into the glue.  The glue's not very sticky, so a hefty coating of chalk and the stickiness is gone.  I stamped on some text with white gesso to add some texture.  I like to use just parts of the word stamp, so I paint on the gesso in a random pattern, trying not to cover the whole stamp.  Added a die-cut set of binoculars, an eyeglass stamp and some strips of marbled paper, toned down with white acrylic paint. 


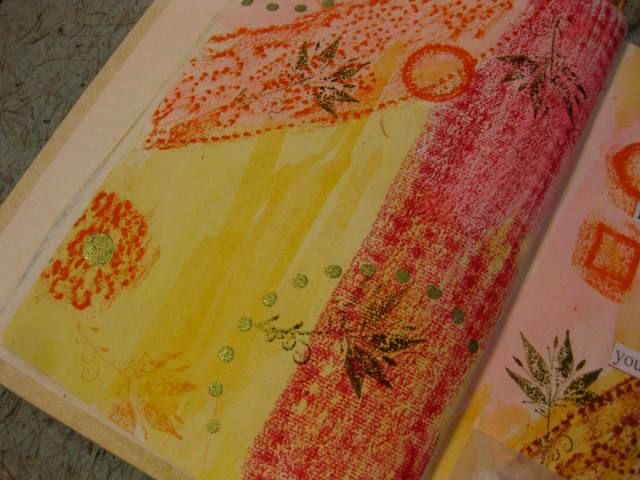
Then a go at a technique from Diana's book - textile paper.  This is way outside my comfort zone!!  Started by doing a crayon rubbing using an embossed pottery plate, a piece of that foam non-slip stuff and a circle and square clear stamp.  Then a wash of watercolor - the wax acts as a resist, making nice texture and watercolor puddles.  I like the yellow crayon best with the light watercolor.  This is the point  while making a background that makes me  think , "arggh, where on earth am I goingwith this"??!!  But, taking Diana's advice, I just charged on.


Next step, stamped leaves and stenciled dots.  I used metallic peridot acrylic paint for the dots - love the metallic shimmer! 


I'm getting into it ! 


Added a little vellum envelope with a little piece of stamped paper inside for some more texture and interest. 

I'm not sure what I'm going to do with this journal - maybe some writing, maybe using it to jot down ideas for projects, maybe just for art play.   I'm trying to leave  room on some of the pages in case I do want to write in it.

Stay tuned for more pages - this is so much fun!


Saturday, June 23, 2012

Origami Money Heart


The bride and groom really just want cash, but just stuffing a bill into a card doesn't seem very festive. Not that anyone complains about a crisp green bill falling out of a card.  I remember a birthday party for a very young nephew; while opening his first gift, a card, he announced, "What, no money"?!

I found this lovely card at The Croft Studio on the Isle of Skye in Scotland - perfect since the groom can trace his ancestors to Scotland.


I saw the money heart on Pinterest - detailed instructions here.  Since I am not an expert at precise folding , I did a couple of practice ones with dollar bills so the crisp gift bill wouldn't have all the "do-over" folds!   It was much easier to fold the new bill as the crisp paper held the creases better.  You could  make this with patterned paper as an embellishment- fun for a valentine card.  After the heart was folded I weighted it down with heavy books to flatten it. 


I glued on a piece of sparkly mulberry paper and attached the heart with a clear silicone dot.  The dot rubs off without tearing the money.


Moolah with style!

Thursday, June 14, 2012

Tim Holtz Distress Ink Markers


I spent all Wednesday morning doing laundry, ironing and reorganizing our closet.  What better way to celebrate than with some new art supplies ?    I've been wanting to try the new Distress Ink markers, so made an emergency trip to my local craft store.   The makers are available in all the Distress Ink colors - I bought Bundled Sage, Chipped Sapphire, and Scattered Straw.  I love the beachy combination of blues and greens.


Like Distress Inks, the markers are water- based and blend without bleeding.  Check out the Tim's tutorial here.  (I need  want that water pen he uses!)  The markers have two tips -  a flexible  brush  and a fine point .  You can use them to color stamped  images or color directly onto the stamp and then stamp the image.


I started out by coloring stamped images.  I stamped these butterflies with archival ink (no running when wet) and  colored the butterflies, then used a fine paintbrush dipped in water to blend the colors.  It's amazing that the colors blend yet stay clear - no muddying!

Then I tried coloring directly onto the stamp,using all three colors.  The stamp looks pretty dry by the time you finish, but a good deep breath blown onto the stamp is enough moisture to revive the inks.


 Love these simple summer tags.  The colors are just gorgeous!  I feel like I'm doing cheater watercolor painting.

I rubbed the edges of the tags with coordinating Distress Inks and added stamped ocean-inspired words.

The coordinating tie was made by swiping Distress Ink pads (Lettuce and Broken China)  onto a craft sheet, spritzing the ink with water and  mopping it up with  the twill tape. 


I then used the same inked stamps to make a second image - another hot breath rejuvenated the marker inks for a second, softer image. 


I found some background papers I'd made  to use as mats on these quick and easy cards.


These markers are a great way to add color and change up the look of stamped images.  Pretty sure I need more colors!

Tuesday, June 12, 2012

Indoor Gardening


I don't have very many indoor plants.  My mother ran a hospice for terminally ill plants -  leggy African violets with a few leaves clinging to the end of six inches of gnarly stems, plastic pots on
mismatched saucers, and poinsettias dropping leaves in July.  I have a few plants, but once they start looking ratty, out they go.  It finally dawned on me the stores are full of new plants for a reason!

I found this beautiful pottery piece at a yard sale and knew I had to do something with it.  It's the perfect size for slices of baguette or little pots .  First up, little pots of succulents. 

I got some little terra cotta pots at Joannes and gave them a quick wash with diluted white paint so they picked up the white in the pottery.

\

 But since I might want to do the baguette-thing at some point, I want to keep the pottery clean.  I cut some pudding cups to go under the pots so there wouldn't be dirty standing water in the pottery.


Plopped in the pots and filled the gaps with some of the many (MANY) shells I collect.


Next project - rooting boxwood cuttings.   I saw this cute idea here.  (This blog is full of ideas for all kinds of lovely things - and you can translate it from Swedish with a link on the blog).


Cut-off plastic bottles make great cloches that help hold in moisture, and the opening means the cuttings won't rot from too much of a good thing.  I added some twine and a tag on one and some green fiber with some small metal embellishments to the other.  SO much nicer than wrapping the pot in a plastic bag!


Friday, June 8, 2012

Little Dresses for Africa


I learned about Little Dresses for Africa from Brian Williams' Making a Difference  broadcast.  (I have a crush on BriWi, but that's a whole different post)!  Rachel O'Neil was touched by the little girls she met in an orphanage in Africa and wanted to do something to make them feel special.  She knew the way to a little girl's heart is a pretty dress !  Her idea was to make simple dresses out of pillow cases and distribute them to children in need.  Over 550,000 dresses have been distributed all over Africa as well as to Haiti, Mexico, Honduras and right here in the US as well.

I've been working on making some dresses to send.  The whole process was fun - selecting pillowcases that would make a little girl happy, raiding my stash of trims to add some pizazz, and seeing 12 little dresses ready to ship out. Theses are easy to make and all the directions are on the website.  Little boys need stuff, too and there are directions on the site for making shorts for them.

Here are my dresses - all ready to ship out!


Next time - shorts for the boys and dresses for bigger girls.


Sunday, June 3, 2012

Tablescape


The Captain and I just got home from Scotland (much more on that later!).  We had a great trip, and as always, there is a point when I'm on vacation that I'm ready to come home.  My head is swirling with new project ideas and I feel  lost after so many days with no creative outlet. Vacations aren't just a time for new experiences; I always come home all fired up with things to do.

Practical things had to take first place - like mountains of laundry, weeds apparently on crack that have taken over the gardens, and over 1,000 pictures( there's no success like excess!)  to edit and organize.  Then there's that jet-lag problem - I've been falling asleep early and waking up at 4 a.m.  I was weeding at 5 a.m. yesterday - the neighbors are beginning to wonder!

But today I had fun making a new tablescape for our dining room table. I've had the Pottery Barn runner and love the text and images.   I used things that speak to my obsessions - old mirrors, shells, letters, stones and bird nests.   I started with an old mirror as a base since I like to be able to pick up all the doo-dads at once when we need to use the whole table.  You get a two-fer using a mirror with the reflected image - a nice bonus!

I separated the nest from the candlestick  base and added a small glass candlestick to it to  hold some limpet shells I collected on a beach in Scotland.  The pottery heart was a find from Paris.


I love Scrabble tiles and use them in art projects, but never thought about displaying them.  I had to play around with them in this beaker.  At first I just dumped them in and for some reason, most were turned to the blank side- go figure!


We live near the beach and it's hard to resist smooth, flat beach stones.  I embellished these - one with a stamped star, one wrapped in a strip of dictionary page and one wrapped with twine.

Feels good to be making things!

Normal Title Italic

Follow Me on Pinterest

LinkWithin

Related Posts Plugin for WordPress, Blogger...
 
SITE DESIGN BY DESIGNER BLOGS