Monday, October 22, 2012

How to Make a Paperbag Memory Book


Most of you know by now that my granddaughter lives too far away.  Luckily she comes out (with her parents!) to spend summer vacation with us.  I make photo books for her every year and this year tried out one of those cool little paper bag books.  We spend lots of time at the beach, so her books all have a beach-inspired theme.

First let me state the obvious - I don't consider what I do "scrapbooking".  I am impressed with the fancy stuff real scrapbookers do - gorgeous albums full of coordinated colors, complicated layouts and clever quotes, but it's just not me.   All that planning and matching and coordinating gives me agita. 

Enter the album made from paper bags.  You can use any size bags - a used medium size lunch bags that are about 6 inches wide.  Smaller bags would work, too - and nothing stopping you from making a really big book with the grocery bag size ones.

 
This is really easy.  Lay out the bags, alternating the open end with the bottom, flapped end. You can use as many or as few bags as you like.  Remember that the open ends and the flap ends are good places for photos, so you don't need as many bags as you have photos.  I used five bags for mine.

Now how to bind the "pages".  Lots of options - punch holes along the center and thread ribbon or some other fiber through the holes and tie, stapling along the center spine, or sewing the bags together.  I opted for the sewing method.

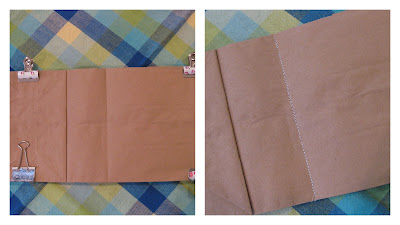
I folded the top bag in half to mark my sewing line and clipped all the bags together so they didn't shift when I sewed them.  Sew along the fold line.

Now the fun part- decorating all those pages.  When Siobhan was here, one of our art projects was to make background papers for this book.  The plan was to use diluted acrylic paint and blow bubbles with it onto plain card stock .  We didn't get many actual bubbles, but we did get lots of great splatters and dribbles.  I cut and punched her artist papers to use throughout her book.


The front cover - on the left with the elastic closure open and on the right with the elastic pulled over to hold the book closed.  I glued some mulberry paper over the binding to hide the stitching.  I clamped it after gluing to really flatten the binding.  I used a paper punch on some of Siobhan's paper to play up the beach theme.


The back cover giving credit to the artist!  I sewed a piece of blue headband elastic into the back cover  to hold thebook closed and then glued a small scrap to cover the stitches. 

 
Some inside pages:
 

On the right you can see how you can use the flap part of the bag to add some more photos.  Open the flap and the picture underneath is visible.
 
 
I glued some ribbon on the center to hide the sewing and added some fun prompts to show that there are more photos underneath.
 
 
See the cutout on the right  where the bag opens?  I added some hole reinforcements to prevent tearing when using the secret inside pages.
 
About those secret pages.  The open ends of the bag make great places for more photos.  In addition to stabilizing the cut-outs, I glued the side fold  shut to make it easier to slid pages in and out. 
 
 
Secret pages :
 
 
I sewed pictures onto some of the artist papers and made a little ribbon tab for easy pulling and because it looks cute hanging out of the book!


I think I'm addicted to these paper bag books.  The sky's the limit when decorating these - you could use some serious scrapbooking talent here or go for a less structured look.  Secret pages could be used for eyes-only journaling.
 
These little books help me stay connected to our granddaughter.  She has brought them to show-and-share and loves  pouring over her books.  Not gonna lie - there's some ulterior motive here.  Since we are far away, I want to make sure she remembers us and what fun she has when she's here.
 
Appearing at this link party:  A2Z

Tuesday, October 16, 2012

Frozen Hearts of Herb Goodness

I have herbs (H-erbs, as Martha would say!) growing in pots by the kitchen all summer.   I saw an idea on Pinterest for preserving herbs suspended in frozen olive oil.  I stopped pinning long enough to actually do it.

This couldn't be simpler - pick herbs, rinse and pat dry with a paper towel.  Rough chop the herbs, and fill ice cube trays with the chopped herbs.  Then drizzle olive oil to fill each compartment. Freeze till firm.

I thrifted this little heart ice cube tray because I thought regular ice cube size might be too big. Since the oil freezes fairly soft, you could even freeze these in a small plastic container, pop out the contents and slice off what you need and send the rest back to the freezer.  Or use regular sized trays and cut frozen cube in half if the whole thing is too much.

 But how sweet are these little hearts of herbs?


These are the sage cubes.  Once the cubes froze solid, I popped them out and put them in freezer bags for storage.


And the parsley ones in small sized regular cubes.


You can do this with left-over herbs from those big bunches you have to buy when you really only need a few sprigs.  I bought some cilantro the other day and had lots left.   Usually left-over herbs turn into The Green Slime of Death in the bottom of the fridge. No more!   I froze these in water instead of oil as a test.

Back in the day, I used to do lots of freezing and canning, but  gave it up when I realized all the other mothers in town spent the summer at the pool!  Now I have some little packages of goodness to add zip to winter cooking and a fleeting feeling that I'm Mother Earth, laying in provisions for the upcoming winter.

Thursday, October 11, 2012

Falling Leaves Collage and The Great Bittersweet Harvest


"October gave a party -
the leaves by hundreds came."

~  George Cooper
 
 
I learned this George Cooper poem in third grade.  Not sure why I'm still using valuable brain storage space on this when I can't remember what I had for lunch yesterday!  But I digress; I want to share a fall-inspired collage.
 
 
I found this little (about 6 inch square) piece of wood on the beach and knew it had potential.  This is the first time I've ever done any art work on wood and it was fun - banging nails is so therapeutic!


I washed on some diluted acrylic paint and added some extra color with oil pastels around the edges.  The stenciled tree was done with acrylic paint.  I cut out leaves from various fall-colored papers.  The fun part was banging in small nails on the leaves and adding some curled wire .  A small piece of torn book binding along the bottom adds some grounding.
 
I kept coming back to work on this, thanks to the advice from Claudine Hellmuth's class.  The leaves seemed too bright, so I went over them with a Tumbled Sage Distress Ink pen.  The tree was too dark and all one shade of brown, so I scratched over it with a raw sienna watercolor pencil. 
 
On to bittersweet -  I know that bittersweet is considered an invasive species, but I can't resist those red berries with their orange cases and all those twirly vines. 


My car, filled with a haul of bittersweet.
 
 
The Captain - bittersweet whacker in chief.  It's hard to see in this picture, but the branch he's holding has a bonus - an empty bird nest ! 
 
 
Now some people might call this crazy, but I told you I love bittersweet.  Here's that branch, sporting its birdie nest and announcing that fall has come to the dining room.
 

Bittersweet in the cloche.  Don't you love this little white pumpkin all blinged -out?

Wednesday, October 10, 2012

DIY (Mostly Cheating) Pillows

 
Is there such a thing as too much of a good thing?
{here}
 
Last post on the family room upgrade - promise!  New duvet covers, new color scheme meant new pillows.  First stop: shopping the house for pillows that will work in the newly upgraded space.  The Captain is not a fan of pillows, so I snagged a couple that end up on the floor next to his chair. 


Add in a few semi- handmade.  This one is really a cheater.  I had cut off the end  a Pottery Barn table runner and whoo-ee, one of my pillow forms fit into it perfectly.  Since it already had 3 sides sewn (told you I just hacked it off), I jammed in the pillow form and whip-stitched the open edge.    There's blue, shells, fancy calligraphy and that Frenchy No 30 - works for me.
 
I saw an idea on Pinterest for no-sew pillows. Follow the link for a good tutorial and better pictures than mine. Basically what you do is lay a pillow form on a length of fabric and proceed as if wrapping a gift.  Instead of tucking  the pointy ends under and taping them as you would do on a package, , you tie them into a knot - voila- instant pillow. 


 A few lessons learned - heavy-weight fabric makes a knot the size of Chicago; the ends needed to be much longer so there is enough fabric to make a knot and still have enough to tuck under the end, and really just barely overlap the fabric over the pillow so you don't end up with too much extra fabric in the tails (reducing that knot-that-ate-Chicago).  My pillow form is 18 inches square and maybe this would work better with a smaller pillow.
 
 
Second try with a lighter weight fabric and using the lessons learned from the first attempt worked out much better.  Work the knot around until it is as flat as possible and tuck the ends into the knot.  Bet this would be cool made with a nice scarf.
 
I still wanted to use that great yellow and blue print fabric, so made this one:
 
 
Pretty simple pillow.  I didn't want to bother with a zipper or other complicated closure ( I am a very lazy seamstress these days), so made a pillow sham.  (Here's an easy tutorial).  My pillow form is an 18 inch square, so I cut a front piece 20 inches square.  Then cut 2 back pieces 20 inches long and 13 inches wide. Fold over and hem the center edges of your 2 back sections.  Over lap the 2 back sections onto the front section and sew them together.  Turn the pillow right side out and add a nice trimmed edge by sewing a one inch seam all around the edge.  Insert pillow form and  done.
 
 
My folded fabric pillow with the bird reminds me of this funny skit from PortlandiaKeep calm and put a bird on it! 


Thursday, October 4, 2012

Family Room Upgrade

Our family room style could best be described as eclectic hodge-podge.  Whatever didn't work anywhere else ended up in the family room.  So here you have it (and proof I have no shame by sharing this crime-against-decorating!):

 
Let's talk about the futons.  When The Captain and I were first married we went to get new covers for his old futons.  Having taken temporary leave of my sanity, I asked him what he'd like. When he said "Southwestern", did I say that I think the only time you can get away with geo-specific decor is if you actually live in the region that inspired the style? Did I say that bright, bold geometric  prints make me nervous?  No, what I said was that I thought it  was a great idea- best ever! After coming to my senses,  I tried with some equally hideous floral print covers that didn't hold up, so the Southwest rose again.
 
 
Enter duvet covers for the futons - and thrifted for $15.00.  Why didn't I think of this years ago? 
New covers, new color scheme - white, blue and tan and things are so much better.
 
 
This little table really started the project.  The Captain spied it on the curb while walking and the price was right - free.  I can't find the "before" picture I know I took, but you've seen lots of these little maple tables.  Some serious sanding, painting and distressing brought this table out of colonial and into cottage.  Now I knew what I needed to do with the rest of the room - all the odds and ends needed the white paint treatment.
 
 
Next up - this coffee table.  Gold-ish metal bottom, natural baskets and pine top - all have to go.
 
 
I sprayed painted the metal bottom and baskets.  After sanding the top, I gave it a white-wash of diluted white paint for a faux vinegar paint look.  This makes a better TV stand than the old green one.
 
I bought the big turquoise frame at an estate sale. I toned it down with a wash of white paint and added my newly distressed frames.
 
 
My painted frames found the perfect spot.


The tray top of this hassock was black and with a coat of white paint it makes the perfect end table for the bigger futon.
 
 
Newly painted bookcase and a mirror from another estate sale spruce up this spot.  I made the curtains awhile ago.  I wanted to use the branches as curtain rods, but that meant I couldn't run the curtain tabs through the branch with all those twigs through the loops,  so I  looped the tabs  over the branches and secured them  some big buttons from my stash.
 
 
A fun tag sale shelf, newly reframed shell pictures and a jar of mussel shells for some more blue, tan and white 
 
 
.
I made a few pillows to bring in some patterns - more on these later.


To recap - from this:
 
 
To this:


Looking at this picture, think I need to move out the wooden chair as it looks pretty cramped along that wall.,  But so happy with the color palette and the duvet-turned futon covers.  Shabby cottage- at the- beach trumps  Southwestern hodge-podge !
 

Tuesday, October 2, 2012

Spray Paint Distressed Frames


Count on Centsational Girl  to come up with this technique.  I love the ease of using spray paint, but sometimes not the total coverage look.  I had an idea for some frames that I wanted to distress and tried out this great technique.

First, rub plain candle wax over areas you'd like to highlight/distress.  Be sure to brush off any stray bits of wax that land where you don't want them, like the piece you see on the lower right.  Don't worry about getting the wax into every little crevice - we're going for distressed here, not perfect .


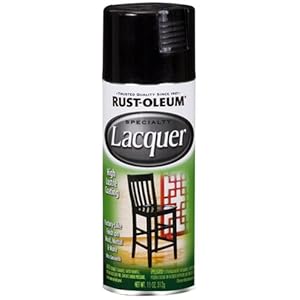
I used this paint on  these little guys  - have you  tried it yet?  I'm in love - hard, smooth, shiny finish - no bumps, no drips- just a wonderful professional- looking finish.


Once the paint is really dry, rub off the wax.  I used an old towel, wrapped around my finger and gently rubbed off the paint on areas I had waxed.  You can find  the waxed areas along the flat surfaces by gently running your finger over the frame - the waxed areas aren't smooth.   I was nervous about  rubbing off  the paint,  afraid I'd scrub it all off, but, but the paint stuck tight everywhere except over the wax.  Pretty cool, huh?
 
 
Waxed over textured elements and sprayed these with plain flat white spray paint.  Scrubbed over them with the towel and again, only paint that came off was areas that had the was treatment.  Yippee!
 
 
Flat white spray paint over wax


Paint rubbed off spots that got wax treatment.
 
 
Spray paint + wax = instant vintage love.

Normal Title Italic

Follow Me on Pinterest

LinkWithin

Related Posts Plugin for WordPress, Blogger...
 
SITE DESIGN BY DESIGNER BLOGS