Tuesday, April 29, 2014

DIY Bathroom Light Rescue


We have the ugliest light ever (at least I think it's the ULE) in our downstairs bathroom.    Builder-grade Hollywood style - lots of original thought and expense went into this selection.    I forgot to take a before shot of my light, but here is a similar one.    Purdy, isn't it?    


I saw a few upgrades on Pinterest and decided to see what I could do with mine.  This project fit my DIY question: " Can I make this any worse"?   If the answer is "no", full-speed ahead.  I mean, really - how could this get any worse?   My actual light has the added benefit of several different types of bulbs, including one that's burned out - fancy!

For starters, I sanded the light and rings.  Then to class it up a bit, I boxed in the base by hot-gluing  thin moulding strips to the base.  I even managed to cut a piece myself with my handy-dandy $6.00 mitre box .   


I primed it with Kilz primer to make sure the paint would adhere well to the metal base.  I painted it with Martha Stewart Cast Bronze metallic paint.


Now for bulbs - I want something more interesting that the usual bulbs.  I saw some on Pinterest with those lovely amber vintage bulbs, but since that much vintage wouldn't work in my room, I went with these:


The clear bulbs still have the cool  filament that glows  when lit.   These are some pricey bulbs at nearly $9.00 a pop.  The man at the customer service desk at Home Depot gave me a 10% discount ( love my Home Depot guys), and since this was a  nearly no-cost upgrade, I splurged . 

Here is my new light fixture, builder-grade metal backing, rusty spots, and mis-matched bulbs vanished.


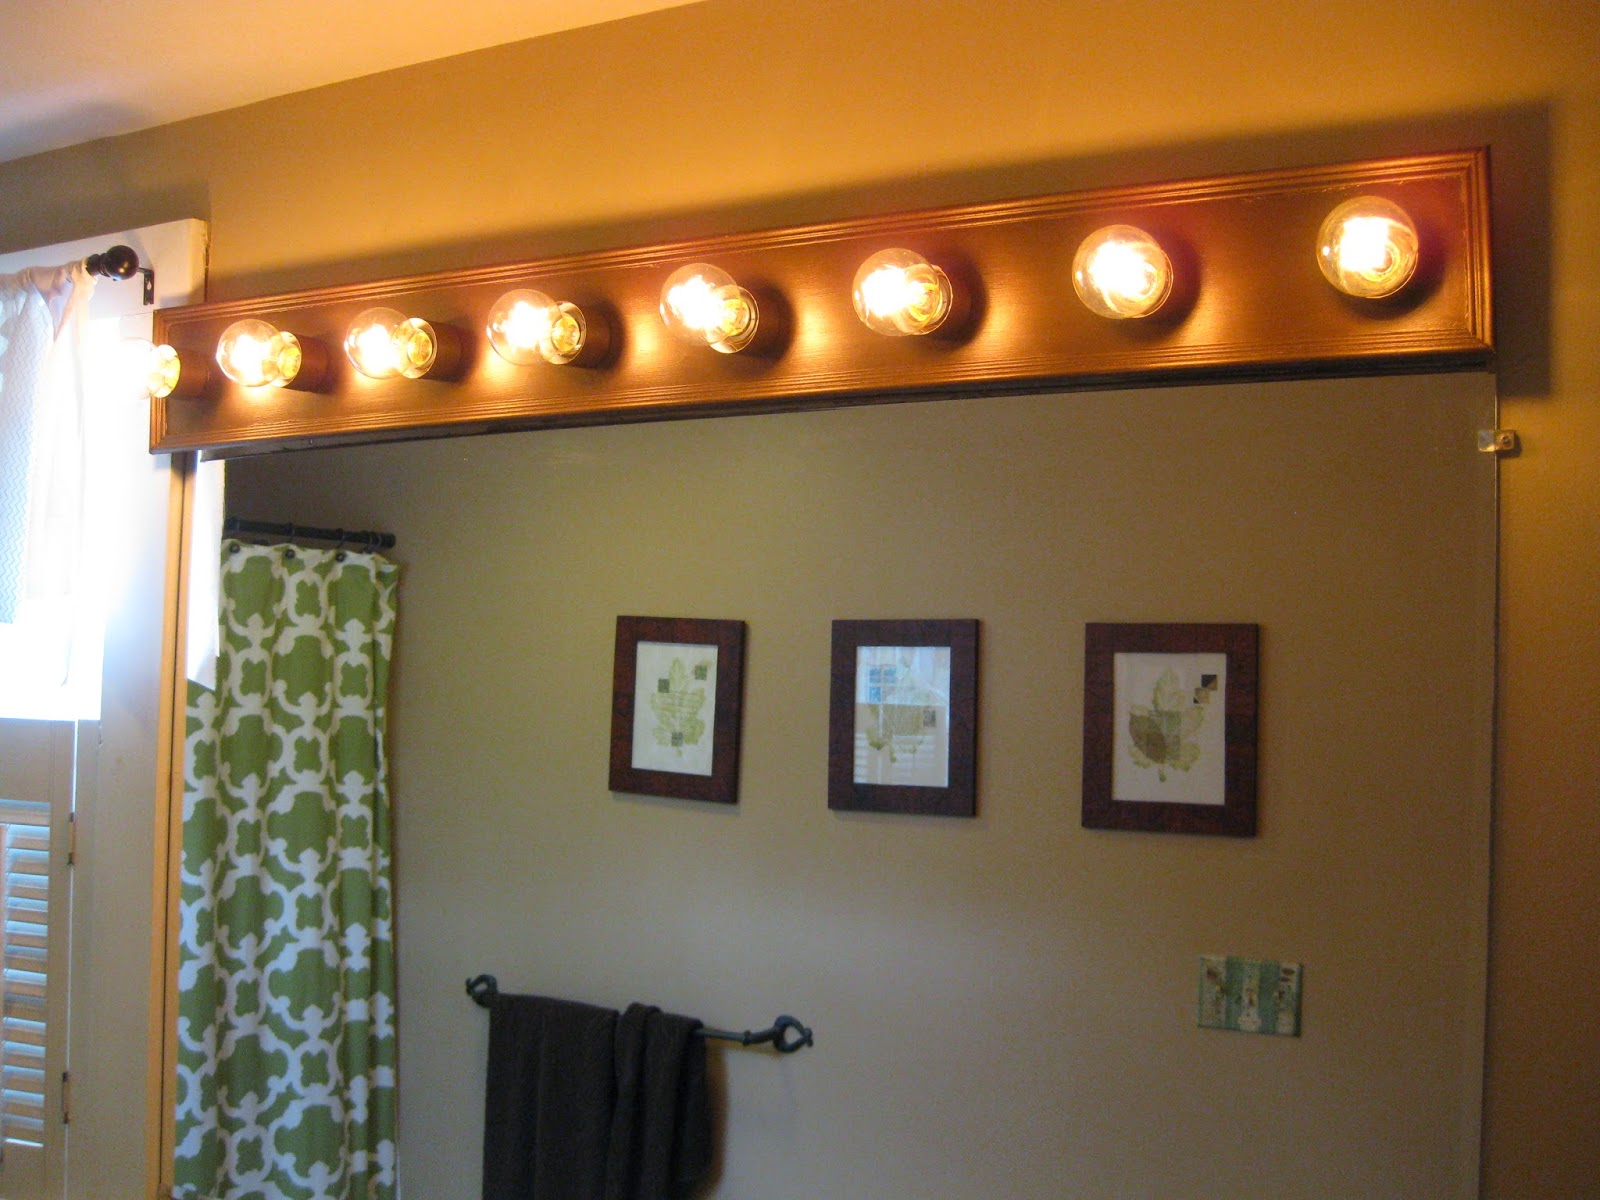
No more bathroom light hate.  I love this new look.

And don't you wonder how we managed in LBP (Life Before Pinterest)?


Friday, April 25, 2014

Spring is Finally Here - A Journal Page to Prove It


It's finally starting to act like spring here in the frozen tundra that is New England.  We had the longest winter on record (it's true; I heard it on TV.)   Spring means growing and green and plants and warm weather.  

We're still waiting for sustained warmish weather, but we're getting there on the other two.   I love to rake in the spring when I can uncover things like this:

 Bleeding hearts

Love these little sedum rosettes


Grape hyacinths


Day lilies hugging a big granite rock

I started my new journal with a spring theme.  This page was inspired by Elaine Schmidt's talented work.   I love using text in my art and  how it shows through watercolors.  


This new journal will be challenging as the pages are much larger than the book I used previously.  It has the benefit of sturdy pages and the spiral binding means the book lies flat when opened.   

I used a blue watercolor wash for the background and them glued on the text strips.


In keeping with my challenge to put more markings on the page with my own hand, I drew the daisy and painted the petals with watercolor.   I cut the heart shape from some hand-stamped and colored paper.  The blue one is chipboard, colored with Distress Inks.  I am obviously in a white-dot phase.  I love how the dots add some pop.


I'm not sure where I got this stamp, but I love it.  I glued it onto a piece of the  acetate that comes with cling stamps. It seems a shame to toss that sheet with all the stamp images on it.   I did a rough rendition of the caught-in-crystal technique on the acetate sheet and chopped it up for accents. 

And yes, spring is a beautiful feeling.

Monday, April 21, 2014

Art Journal Vol. 1


I just finished my first art journal and wonder why I waited so long to start this totally addictive art play.  Art journaling is a great place to play without any pressure - no project to finish, no specific plan or goal, just play and see what happens.   

Like you all, I've drooled over all those really artsy art journals and poured over art journaling magazines.   Since I have very little drawing skills and none of those fancy watercolor painting ones I'd assumed art journaling wasn't for me.  Wrong!  There's always collage and stamping and color washes and general messy art stuff to do.

I didn't have a plan for what I wanted from this journal, but I did know that I wanted to experiment with making marks on the page with my own hand - doodles, words, letters and maybe even a cat and play with background techniques.  I wanted to use some of the bits and pieces on my desk and play with color.

Of course, not every page in my journal is a masterpiece, but every page taught me something - mostly what NOT to do.  Here are some of the things I've learned playing in my journal: 

     *   Choose your journal wisely.  I used a book with handmade paper, and while I love how the rough paper absorbs color, it also absorbs LOTS of water.  I hadn't really planned to be using water, but I ending up using  watercolor, homemade sprays and diluted acrylics , all of which involved lots of water.  So I have bleed -through on some pages .

     *   Gesso with gusto.  Gesso painted on the pages helps resists the bleed- through and also add some great texture.  I usually paint it on pretty randomly (now if  I'm planning on adding watery paint, then I  gesso completely).

     *   Document a new technique or color-combination that you might want to try again.  Write under a tag, put a small paper inside an envelope with the details, but find someplace to write it down.   This is probably my favorite page, but I didn't write down the colors I used and haven't been able to replicate it!


    *  Jot down a date now and then.   Make it part of the design or hidden somewhere. 

    *  This one is embarrassing to admit because probably everyone knows this .   If you're using a bound book,  press open the binding so the pages lie flat.   I have a few early pages with a white center stripe.  Some I could do back and fix, some, not so much.

    *  Treat a two-page spread as one page.  I tried to make two coordinating pages and could not pull it off.

Here are a few of my favorite pages.  


I'm not comfortable actually journaling in these.  I know some people find it helpful to write down their thoughts; it makes me queasy just thinking about spilling my guts on paper.   I do use quotes that speak to me.  Apparently this one was really speaking to me as I used it twice!


Think it's safe to assume that quotes can be pretty revealing!


This one sums up the most important lesson of all:


Now on to Volume 2.    

Tuesday, April 15, 2014

Martha Stewart to the Rescue - Again


I've been on a bread-baking kick lately, having discovered how ridiculously easy it is to make Jim Lahey's No Knead Bread.  Honestly, mix it and let the magic of yeast do its work, then bake - it's really that easy.

I've been baking the bread in my old  ( as in purchased when I was in high school , at the end of the Pleistocene era) dutch oven.    The stainless steel pot with a loaner lid and no handles did the trick, but seriously,  I needed an upgrade.   

My first idea was to go all out and get one of  those chi-chi Le You-Know What ovens.  I just could not convince myself to spend  $350.00 for one pan .  The Captain says I'm cheap to keep, but really maybe I'm just cheap.  

Enter the Macy's flyer, with a one-day sale on Martha Stewart enameled cast iron cookware.   With the one-day sale and a coupon, here is my new $45.00 dutch oven.   Even at the full-price tag of $149, it's still orders of magnitude cheaper that the Le You-Know-What one.


This is one serious pan, weighing in at 12.6 pounds.  I love all the colors, but since I'm in a blue phase, this marine blue color is perfect.

Since I saved so much money on my Martha pan,  I replaced a 1980s vintage pan that is the perfect size, but looks exactly like you'd expect a chap 80s pan would look.   


Calphalon sale at the outlet - more money saved!

To celebrate all this saving, I found this summer tuxedo shirt at JJill - also on sale.


Two new pans in one day - I do live an exciting life.

Saturday, April 12, 2014

Bloglovin PSA


Change is so darn difficult !  Since Google Reader was murdered, I've been reading my blogs on Bloglovin and like the format.   But I never got around to adding mine so someone out there could find and follow me.  It just seemed so complicated. 

But like most of the things I whine about, it's not really all that bad.    I found this  tutorial here - with easy instructions and screen shots.  No need to recreate the wheel, so check it out .

This code has to be in the blog post to make it work, so here goes:

href
="http://www.bloglovin.com/blog/5171657/?claim=whpqght6xhb">Follow my blog with Bloglovin
Once Bloglovin' recognizes this code, add the Bloglovin button and DONE.  

The Borg will be happy, or at least  they'll be what passes for happy with Borgs.


Friday, April 11, 2014

Nest in a Mug


I found this mug at a vintage shop and loved the spring colors.  I knew it would make the perfect spot for a little nest.


It's actually a shaving mug; the shelf with holes is where the soap sits.   


I made a spot for the nest with some strips of burlap, paper ribbon and strips of dictionary text.   Then added a little nest, some feathers and the faux robbin eggs.


Pretty sure I'll be drinking out of this mug after the eggs hatch.

Normal Title Italic

Follow Me on Pinterest

LinkWithin

Related Posts Plugin for WordPress, Blogger...
 
SITE DESIGN BY DESIGNER BLOGS