Most of you know by now that my granddaughter lives too far away. Luckily she comes out (with her parents!) to spend summer vacation with us. I make photo books for her every year and this year tried out one of those cool little paper bag books. We spend lots of time at the beach, so her books all have a beach-inspired theme.
First let me state the obvious - I don't consider what I do "scrapbooking". I am impressed with the fancy stuff real scrapbookers do - gorgeous albums full of coordinated colors, complicated layouts and clever quotes, but it's just not me. All that planning and matching and coordinating gives me agita.
Enter the album made from paper bags. You can use any size bags - a used medium size lunch bags that are about 6 inches wide. Smaller bags would work, too - and nothing stopping you from making a really big book with the grocery bag size ones.
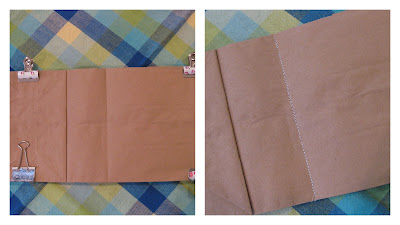
Now how to bind the "pages". Lots of options - punch holes along the center and thread ribbon or some other fiber through the holes and tie, stapling along the center spine, or sewing the bags together. I opted for the sewing method.
I folded the top bag in half to mark my sewing line and clipped all the bags together so they didn't shift when I sewed them. Sew along the fold line.
Now the fun part- decorating all those pages. When Siobhan was here, one of our art projects was to make background papers for this book. The plan was to use diluted acrylic paint and blow bubbles with it onto plain card stock . We didn't get many actual bubbles, but we did get lots of great splatters and dribbles. I cut and punched her artist papers to use throughout her book.
The back cover giving credit to the artist! I sewed a piece of blue headband elastic into the back cover to hold thebook closed and then glued a small scrap to cover the stitches.
Some inside pages:
On the right you can see how you can use the flap part of the bag to add some more photos. Open the flap and the picture underneath is visible.
I glued some ribbon on the center to hide the sewing and added some fun prompts to show that there are more photos underneath.
See the cutout on the right where the bag opens? I added some hole reinforcements to prevent tearing when using the secret inside pages.
About those secret pages. The open ends of the bag make great places for more photos. In addition to stabilizing the cut-outs, I glued the side fold shut to make it easier to slid pages in and out.
Secret pages :
I sewed pictures onto some of the artist papers and made a little ribbon tab for easy pulling and because it looks cute hanging out of the book!
I think I'm addicted to these paper bag books. The sky's the limit when decorating these - you could use some serious scrapbooking talent here or go for a less structured look. Secret pages could be used for eyes-only journaling.
These little books help me stay connected to our granddaughter. She has brought them to show-and-share and loves pouring over her books. Not gonna lie - there's some ulterior motive here. Since we are far away, I want to make sure she remembers us and what fun she has when she's here.
Appearing at this link party: A2Z


That is so fantastic you make her a book every year, she will treasure those. What a wonderful way to keep that grandma memory going for her!
ReplyDeleteThank you for stopping by and commenting on my atcs, Deb, I appreciate it!
PS--None of my scrapbooks are matchy, either, OR in any kind of chronological order! Just random pages of whatever pics got the luck of the draw!
:)