Wednesday, December 28, 2011

Recycling Wrapping Paper


Does this look familiar?  Are we really throwing all this paper away?  Is there a better way?

As many of you know, I have a thing about paper and love using nice paper and doo-dads to make packages look special.  Now for the crazy part - I also recycle everything and never considered the volume of wrapping paper to be a problem because I was recycling it all - that's good, right?  Turns out not so much.

The Captain read something about wrapping paper not being recyclable. WHAT??  I did some Internet research and found that many cities don't accept wrapping paper in their recycling program because most of it isn't actually recyclable.  Cheap wrapping paper  is so thin it doesn't have fibers suitable for recycling.  The heavier kind is often laminated and glittered - and then there's the pesky tape stuck to it.  Also, the dye process most commonly used is "beater dye" in which the dye is actually in the pulp of the paper, not just printed on top and the process used to remove ink  doesn't work well on beater dyed paper.

As is all that isn't enough, consider these scary statistics :  wrapping paper and shopping bags account for 4 million pounds of trash a year .  We spend $2.6 billion per year on gift wrap.

OK, so clearly I need to change my gift wrap obsession.  There are many alternatives - paper that is actually recyclable like this great  wrapping done by Montana Daughter - white tissue, twine, recycled tags  and gum tree pods:


There are other options, of course : craft paper (plain or dolled up with bits of paper, ribbons, buttons), newspaper ( stamped, inked, or otherwise dolled up), comics, and the gift wrapped in a gift , like a box wrapped in a scarf.   I need to get more creative and less wasteful!

But for this year, since I already bought and wrapped everything, I needed to do something with the leftovers.   I saw on idea on Martha (of course!) about shredding wrapping paper to make filler for packages.  This is a win-win - uses up the paper we already bought AND means we're not buying shredded paper for packing !

So, here is some of the leftover paper , ready to be shredded.  I ironed it a bit (I recognize that is, as my daughters would say, "cray-cray"!).  As you can see, most of it is the kind I now recognize as non-recyclable!


But look at this - colorful packing filler!


Once it's all shredded, you can't tell it Christmas paper so it works for any box that needs some extra padding.  We have the cross-cut kind of shredder that makes smaller pieces.  This would be even better with just the straight cut shredder.


Here's to recycling and making better choices. (But I do have a stash to use up first....)


Wednesday, December 21, 2011

Magnets - Another Quick and Easy Gift Idea


These magnets are all over blog land and with good reason - quick, easy, inexpensive and look like the ones you find in chi-chi gift stores.   The glass mimics a magnifying glass, making the images even more impressive and the technique is very forgiving.

You  make these from supplies you probably have - artist papers, glue and glass marbles.  I found the glass pieces at The Dollar Tree - Michaels, Joanne's and Hobby Lobby were all out of the clear ones.  Apparently everyone else already made their magnets!


There really isn't much to this project.  Select papers with an element you want to emphasize.  Look at your stash of papers with an eye towards small details.  I also stamped some - green lady at the bottom and script above it.  I found that heavier weight (scrapbook style) works better than thinner paper like wrapping paper which tended to wrinkle more.  Papers printed on both sides have the added bonus of making the back of the magnet look better if these things matter to you.  Check your stash of previously stamped images or bits of paper - here's a perfect time to use them.

Then cut out the circles of areas you've selected.  I thought this would be easy, using my 1 inch paper punch.  It would have been, except the glass pieces were and inch and a half!  So I just drew around the glass piece and cut the circles out by hand. 

Now spread glue onto the flat side of your glass piece.  I like using Aleen's Paper Glaze with its narrow tip applicator that you can use to smooch the glue all over.  You want to completely cover the glass.  Then lay your cut-out circle (face down) onto the glue and slide it around to cover it with glue and to push out any little air bubbles.  (I did get a few with some small bubbles - sort of makes it look like hand-blown glass, so not to worry!).  Once dried, trim away any paper that extends over the edge.  Oh, and try not to get glue on the front of the glass - it is very had to remove.  (Don't ask me how I know this!)

Glue a magnet to the back and you're finished. 


You could make these tonight, but you probably should just have a glass of eggnog and file this away for next year or a less-crazy gift-giving future event!

Monday, December 19, 2011

Stairs - The Final Installment!


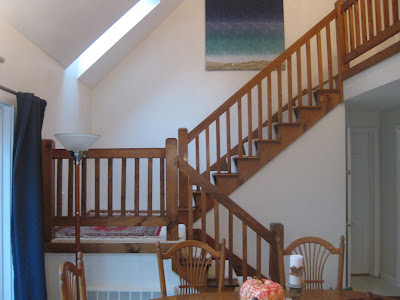
The never-ending stair project is finally finished !  I love how it (finally) all came together.  I also love that is is D.O.N.E.  Not going to lie, this was one looong project.  I won't be changing it up anytime soon!

First, just to recap - here's the "before" - dark wood, white carpeting and cabin-in-the-woods end caps.


Two coats of primer  and three coats of paint later, no more dark wood.  Unfortunately it took awhile for me to find this magic tool:


This little gizmo makes painting the banisters orders of magnitude easier than using a brush.  It fits in between the banisters, the pad hold plenty of paint and produces a  smooth finish- all for less than $3.00! 

I painted the stairs and risers a clean semi-gloss white.  The board that runs down the side of the stairs ( I now know this is called a "skirt board") is Sherwin Williams Sea Spray (941) - a greenish, blue that changes depending on the light.

I had originally thought I would get a runner at Lowe's - economical, convenient and boring practical.  The Captain would have none of it.  He thought that after spending weeks sanding, filling holes, priming and painting I should find a runner I loved.  Bless his pointed head - we started shopping for runners.  California Daughter thought we should investigate Carpet Liquidators.  Trust me, shopping there is not for the  faint of heart!  It's in a huge warehouse, rugs piled everywhere and basically a self-help affair.  But we found a beautiful wool runner for a fraction of the cost of man-made fiber ones at the rug stores.  Yes, it was much more expensive than Lowe's, but it's just what I was envisioning.


The Captain did the installation - my hands are not strong enough to pull and staple, so I did the supervising.  We rented the stapler and "knee kicker" - a handy tool that grips the carpet and when braced on your knee, pushes it tight into the space between the tread and the riser.  The staples are very narrow and long. 


A couple of favorite  extra touches completed the transformation.  The baseboard on the landing was pitiful - two narrow pieces of wood butted end-to-end.


We  found a piece of moulding in the attic, and armed with a $15.00 mitre box and saw, gussied up the landing.  I love it!


The caps on the newel posts were rough as well .( And here, covered in sanding dust)


 Check out the new ones!


Loving my new stairs and loving that they are finished! (Well, nearly  - there's a section of the runner that will go on the landing once it's bound.)


Thursday, December 15, 2011

Quick and Easy Stamped Coasters


The Captain's office staff makes his job easier, so I like to bribe them show my appreciation by making something for them.  This year I was stumped ; I've made notebooks, tags, ornaments - now what?  Coasters!  Quick, easy and useful - what's not to like?


I use these unglazed tiles from Home Depot.  They come 9 to a pack and cost about 65 cents a tile.

First, wipe off the stone dust with a damp paper towel and allow to dry completely.  Here they are all wiped down and drying.


Then, stamp onto tile.  I use StazOn black ink for the main image and red for a spot of color.  Since the tiles are natural stone the surface is uneven, so images with clean lines and not much detail seem to work best.  The exception is an all-over script stamp - since we're going for design, not legibility, it works!    For some reason I had problems with the black ink on my clear stamps.  Red rubber ones inked fine with the black StazOn (a brand-new pad), but the clear ones didn't.   No problem with the red StazOn - anyone have any ideas? 

You need to use a fair amount of pressure to stamp the uneven surface.  Sometimes it works easier to place the tile on the stamp instead of stamping onto the tile.  I suggest buying a few extra tiles for the occasional "oops".  Actually, some of those "oops" can be fixed by a strategically placed accent image! 

Here's are the tiles all stamped.

Next some feet to protect furniture.  I cut little squares out of sticky-back felt.  I have used small felt furniture pad circles, but they are a bit too fat .  The sticky-back felt is much thinner and the coasters don't look like they're perched on stilts!


Then a couple of light sprays of clear acrylic to protect the stamped image and coasters are done.

A few of the stamped designs:


Happy Stamping!

Monday, December 12, 2011

Nutella Nirvana


We found this humungous jar of Nutella on our last trip to NYC.  No, we did not buy $65.00 worth of Nutella goodness!  In fact, I try NOT to buy Nutella at all because of my very favorite, seriously simple go-to Nutella recipe:
1 cup coffee
1 jar Nutella
1 spoon

But for some reason I recently bought 2 jars  and have so far resisted the call of the Nutella.  Luckily The Captain's office is having a cookie swap and I found a great cookie recipe from Erin's Food Files:

NUTELLA COOKIES
Ingredients:
½ cup unsalted butter, at room temperature
½ cup granulated sugar
½ cup firmly packed light brown sugar
½ cup Nutella or other hazelnut chocolate spread
1 egg
½ tsp. Frangelico (if you have it, if not vanilla will work just fine)
1 ½ cups flour ( I use white wheat flour)
1 tsp. baking soda
¼ tsp. salt
1/3 cup mini chocolate chips (I chopped some semi-sweet Trader Joe's baking pieces)
Directions:
Preheat oven to 350F.
Cream butter with an electric mixer about 1 minute until smooth. Add in both sugars. Beat on high speed about 3 minutes until light & fluffy, scraping down the sides of the bowl as needed.
With the mixer on low, add the egg and Frangelico (or vanilla). Then add the Nutella and mix well.
In a small bowl whisk together the flour, baking soda, and salt. Add dry ingredients to wet ingredients, and mix on low speed until incorporated. Increase the speed to medium and mix just until the dough is smooth. Fold in chocolate chips.
Using a small ice cream scoop (or a teaspoon) form the dough into balls and place on greased cookie sheet. (To prevent  cookies from spreading too much, I stuck the cookies on the cookie sheets in the freezer for about 10 minutes before baking).
Bake 6-7 minutes until the tops just start to crack. (or 7-8 if baking from freezer). Let cookies cool about 5 minutes and transfer to a rack to cool completely.
************************
These make great little cookies, but I still had some Nutella left over, so I made cookie sandwiches - spread Nutella on one cookie and top with another.   Now I have cookies for the swap and the Nutella is gone!


Tuesday, December 6, 2011

Making Christmas Trees From Books


On the principle that you can never have too many Christmas trees, here's a tree made out of a discarded book.  These are all over blog land and Pinterest;  even Martha has a few versions.  This book project requires no page cutting, just folding, so it's lots easier and much less messy than my book pumpkins!  

I made mine from a discarded book, but you can use a phone book, a substantial magazine (like Martha's or Real Simple - they have a rigid spine so the book won't flop over) or even part of a book.

Start by removing the covers from your book.  If  using part of a book, remove the spine, count how many pages you want to use and cut down the spine to separate them from the rest of the book.

Now, start folding:


Now you need to get rid of the little triangle that hangs down.  Score it against the book, then flip it inside so the bottom of the page has a straight edge.


See the little tip flipped inside?

Here's how a finished page looks:


Once all your pages are folded, open the book and  press the pages open so the tree fans out nicely.  I glued the first and last  page so it would stay open.

There are several options for coloring - spray paint, ink each page similar to the pumpkin technique or  apply glitter.  I don't use much glitter, but if any occasion calls for sparklies, it's Christmas!  I just ran a glue stick randomly over the folded edges and then sprinkled on some glitter.  You could also leave the pages uncolored or un-sparkled - the tree looks cool au natural as well.


I stuck a small ornament into the spine as a topper.  The "trunk" of my tree is a little bowl made by the best uncle in the world. 

Happy folding!

Monday, December 5, 2011

Trot Trot to Boston


Yesterday was bright, sunny and relatively balmy (by New England standards), so The Captain and I headed to Boston for some holiday shopping and gawking.  We live only an hour away, making a trip to the city a fun and easy day trip.
Newbury Street is the best for window shopping, treat buying and people watching. And now that Anthropologie moved there, it is complete, although I do miss the massive wooden doors on their store on Boylston!


Hundreds of vintage sewing machines - each one beautiful!


Vintage - inspired hat shop.  The Captain made a "surprise" gift purchase here!


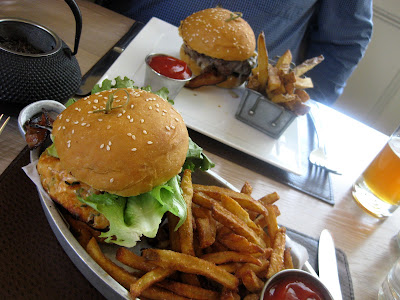
Lunch at The Met Bar.  Love the little pan of fries!  Details, details, it's always in the details!


And speaking of details, love this idea of an open weave drum shade around the chandelier.  Tones down the foufou- ness of the gold fixture and diffuses the light - beautiful!


A few more fun window displays:


And some "I don't care that I'm acting like a tourist" shots:
Enjoy your holiday shopping!


Normal Title Italic

Follow Me on Pinterest

LinkWithin

Related Posts Plugin for WordPress, Blogger...
 
SITE DESIGN BY DESIGNER BLOGS