Showing posts with label beach. Show all posts

Friday, April 15, 2016

DIY Beach Art


I've been staring at a blank wall while I drink my morning coffee.  The Captain brings coffee to me in bed - surely one of life's special luxuries!  I haven't been able to find anything to hang between the windows until I saw beach-y scenes painted on pallet boards all over Pinterest.   

I've had my eye on an old pallet leaning against the neighbor's garage that I thought I could use, but then on a recent trip to Hobby Lobby*,  I found these:


The Captain hooked the two together to make the perfect size for my beach.


Here are the paints I used.  I watered them down to just make a wash of color and mixed things up as I went along.  The goal isn't full coverage, just a wash so the wood underneath shows through.


A watery mix of tan and white made the sand at the bottom.


And then washes of light-to-dark blue for water.


A very light blue for the sky with some pounces of diluted white to suggest clouds, a bit of brown along the edges and my beach art was done.


This is my new morning coffee view,  and I love it.

* I don't usually go to Hobby Lobby because, as Snoopy's brother Spike said about his girlfriend, "We have religious differences".   I like religion and shopping widely separated  and employees not subject to employer's idea of what kind of health care should be covered - not the case for either at HL.  

Tuesday, October 14, 2014

DIY Ocean-Themed Notebooks

We had new floors installed in the upstairs rooms of our house.  This meant that I had to clear everything out of my studio and trust me ,  there was a whole lot of everything!  What a perfect time to get rid of things that really don't work with my style,  and all things I bought of the "everyone else is using this and thinks it's the best thing ever" variety,  but have never used.    I went through all the drawers, all the boxes, all the bottles of glue, mediums, and paint and guess what?  It turns out that I am :


One of my more startling discoveries was the drawer full  overflowing with journals and notebooks. Big ones, small ones, folding ones, fold-out ones -you name it, I most likely have it.   I may need a 12-step program: "Hello, my name is Deborah and I have a journal obsession.  It has been zero days since I added to my stash of 67 journals".   67?  67?  OK, so many are thrifted or yard sale finds but clearly this is out of hand.

I rediscovered these journals I bought from Pick Your Plum.  I'm in a kraft paper phase and the handles just sealed the deal.


(This is actually the back, since I again forgot to take a "before" shot!)

I knew what I wanted for these - something simple that wouldn't cover all that kraft paper goodness, with beachy-colors and stamping.


I swiped on gesso and then some paint - some with acrylics, some watercolors.  This sea star was one of those $1.00 stamps from Michael's, embossed with white powder to make the image sharper on the texture from the gesso.


Two colors of embossing powders and some scraps from my stash of paper scraps.


More of those inexpensive ocean stamps.


Couldn't resist at least one birdie.


The notebook came with kraft paper covered pens.  I painted them with Distress Inks to coordinate with the covers.


It's a bit of a pain to pry the cover off the bottle of stain, but not a big deal.  Then just dip and paint.  


The kraft paper takes up the stain unevenly, giving the pens a nice marbled look.

I've done a major clean-out of my supplies (one full 33 gallon trash bag to the Salvation Army, making the day for some lucky crafters) .  My goal is to  focus future purchases on things I really love and know I will use.  But then there is this:


Thursday, June 14, 2012

Tim Holtz Distress Ink Markers


I spent all Wednesday morning doing laundry, ironing and reorganizing our closet.  What better way to celebrate than with some new art supplies ?    I've been wanting to try the new Distress Ink markers, so made an emergency trip to my local craft store.   The makers are available in all the Distress Ink colors - I bought Bundled Sage, Chipped Sapphire, and Scattered Straw.  I love the beachy combination of blues and greens.


Like Distress Inks, the markers are water- based and blend without bleeding.  Check out the Tim's tutorial here.  (I need  want that water pen he uses!)  The markers have two tips -  a flexible  brush  and a fine point .  You can use them to color stamped  images or color directly onto the stamp and then stamp the image.


I started out by coloring stamped images.  I stamped these butterflies with archival ink (no running when wet) and  colored the butterflies, then used a fine paintbrush dipped in water to blend the colors.  It's amazing that the colors blend yet stay clear - no muddying!

Then I tried coloring directly onto the stamp,using all three colors.  The stamp looks pretty dry by the time you finish, but a good deep breath blown onto the stamp is enough moisture to revive the inks.


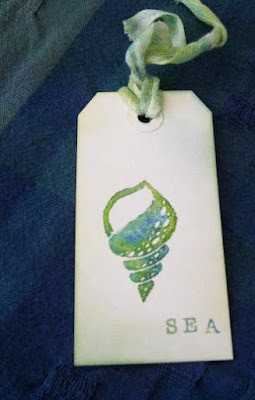
 Love these simple summer tags.  The colors are just gorgeous!  I feel like I'm doing cheater watercolor painting.

I rubbed the edges of the tags with coordinating Distress Inks and added stamped ocean-inspired words.

The coordinating tie was made by swiping Distress Ink pads (Lettuce and Broken China)  onto a craft sheet, spritzing the ink with water and  mopping it up with  the twill tape. 


I then used the same inked stamps to make a second image - another hot breath rejuvenated the marker inks for a second, softer image. 


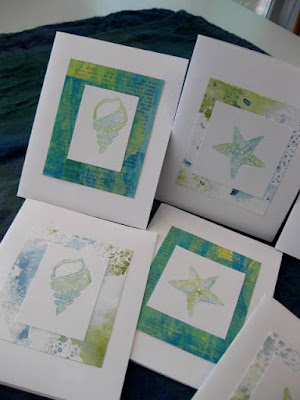
I found some background papers I'd made  to use as mats on these quick and easy cards.


These markers are a great way to add color and change up the look of stamped images.  Pretty sure I need more colors!

Friday, July 15, 2011

Coastal Decor


I'm redoing our guest room, the former man-cave of our youngest son.  Since many of our guests don't live near the ocean, I decided to give the room a full-on beach-y feel.  I'm not usually a fan of "theme" rooms, but since we live very close to the ocean, we have the street beach-cred to pull it off. 

I found lots of inspiration at one of my favorite blogs, Completely Coastal.  This site is full of wonderful beach decor and ideas for using all those shells and beach treasures.   Then flipped through the Pottery Barn catalog for more ideas.  It's no secret that I love their ideas, but not their prices!  Like many crafty-types, I look at their stuff and my first thought is, "How cool is that" and my second is, "I can totally make that!" 


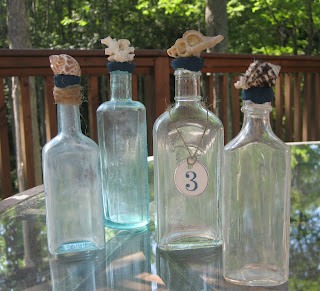
I've seen these bottles in very pricey catalogs - these are from Wisteria.  These shells are soldered on and that's beyond my capabilities, but I thought I could recreate this look.  I started out by gluing paper "caps" onto the bottle tops to avoid having the "solder" drip into the bottle.  I used grout for the solder and was glad I had the little top on - it gave a firm platform and did prevent droppings inside the bottle.  I swirled it onto the bottle top, and frankly, it looked pretty rough.  Once it dried a bit, I was able to pat it smooth and make it follow the contours of the bottle.


I painted the grout dark blue - thought the black was too harsh for my color scheme and then glued on the shells.  I couldn't resist adding a tag to one and wrapped one with twine.


Love my free shell bottles!

Next a Pottery Barn knock-off based on these lanterns from PB.  Boston Daughter bought this lantern for me and now it have been PB-ized:


I saw this somewhere and can't remember which chi-chi catalog.  This one was easy - wrapped a glass cylinder with burlap and then tied on some muslin-stamped ribbon I made.  Some sand, a candle, shells and done.


Stay turned for the big reveal!


Saturday, July 10, 2010

Weekend Images

Love these lacy clouds hanging low over the beach. After a week of weather more like Florida than New England, these clouds brought some wonderful rain. No need to water gardens today! I do feel sorry for people who plan a big beach weekend and then have it rain on their maybe once-a-year trip to the beach. One of the many benefits to living near the beach is that we can enjoy the beach in all kinds of weather.
I live in a beach town - not one of those upscale, gentrified beach towns (not that I have anything against them- most places benefit from a bit of buffing up!), but one that celebrates the inner whack-a-doodle. I found this fantastic fortune teller's panel truck in town today. I love the window boxes hanging precariously off the back "deck".

Check out the mermaid's body - pretty creative use of dinnerware! Now, this is a mixed-media project.
I stopped for some road-side gardening to collect my favorite flower - Queen Anne's Lace. It's at least as pretty as many cultivated flowers, with those big, white, flat flower heads, lacy foliage, and droopy buds. I'm going to get some seed next spring (yes, they sell it!) and plant it on our front slope. I hope it takes off like it does on every neglected scrap of ground near the roads.

Normal Title Italic

Follow Me on Pinterest

LinkWithin

Related Posts Plugin for WordPress, Blogger...
 
SITE DESIGN BY DESIGNER BLOGS