Showing posts with label art. Show all posts

Friday, May 19, 2017

Mixed Media Art - Urban Flair

Things have taken a decidedly complicated turn here:


Surgery on my foot with limited mobility means I have to get creative to be creative.  My craft supplies are upstairs, and climbing them is a bit tricky, so I'm limited to what I can carry on my one trip per day!  Of course The Captain is willing to get things for me, but don't want or need to haul too much downstairs.


I saw this video from one of my Facebook groups - Mixed Media Morsels by Cat Hand called Urban Flair.  It's a perfect couch project - cutting up magazine pages, then gluing them down.

I decided to use the magazines I had in front of me - Flow and Stampington- not too shabby!   I looked for pages with pink, green, and a bit of blue, so my take is less urban, more shabby chic.  Here are my pages:


And here they are, cut into strips.  I cut them 1/2 wide, but it would also work wider, narrower and even varied widths.


I used a firm card stock from a Flow magazine as a base, then glued down strips using a glue stick.


Once all the strips were glued down, I added a few images cut out of my magazines.


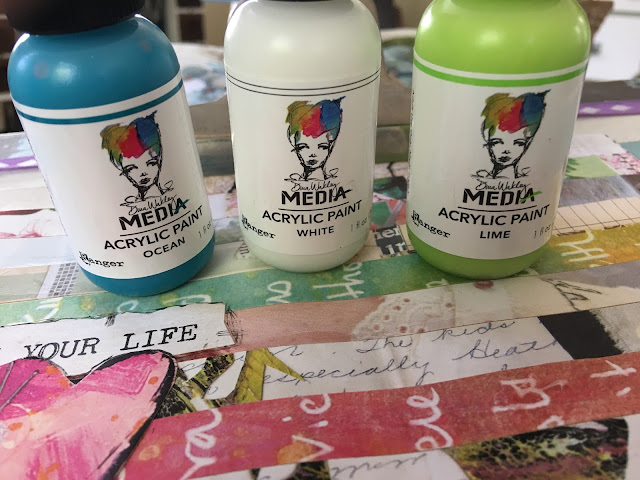
Then I swiped on some acrylic paints - using these Dina Wakley paints and an old store card.


(A blurry view of paint-swiping).


Here is the finished page, but I thought it needed something else - splatters and a squiggly border, of course !


This was a fun, easy journal page.  Thanks for the inspiration, Cat Hand!

Tuesday, April 18, 2017

Toilet Paper Roll Painting (The Toilet Paper Roll Fascination Continues)


My art video watching continues - as long as the news is so depressing,  I'm watching more art videos   in an attempt to limit my daily dose of outrage.    This piece was inspired by another video by Marta Lapkowska.   We've moved on from toilet paper roll dandelions to using those elegant tubes to paint backgrounds.

As usual, I got carried away with the process and forgot to take a picture at the beginning.  The technique is pretty simple- you essentially use the paper roll like a brayer.  Because of the texture and flimsy nature of the roll, you don't get full coverage, but something more abstract .  Roll tube in paint and roll onto your paper.  I really couldn't get the tube to do much actual rolling, so did some sort of "drop, roll, drag" on the paper.

I used a combination of acrylic paints:


After getting the paint on the paper and while it is still wet,  rub some circles in the wet paint with your finger.


Then I  added some black and white circles around the smudged ones using a cardboard tube - white paint for the white ones and stamped the black ones with StazOn ink.   


I added some white paint dots , some text stamping,  and a quote that seemed appropriate for this experiment.


Check out Mart's videos and FaceBook group - she does such fun stuff.

And in case you don't have a supply of toilet paper rolls ( who doesn't ?),  you can purchase them on Etsy ,  Ponder that thought for a minute !!


Wednesday, March 1, 2017

Dendritic Mono-printing


In keeping with my plan to watch more art videos and less news, I came across a video by Cat Hand on dendritic mono-printing, which sounds way more complicated than it is.  The technique is basically this:   spread a fairly thick layer of acrylic paint between two sheets of glass,  smoosh  the glass together, then carefully lift the top piece of glass off and  place a piece of paper over the painted surfaces to lift prints.  Cat has also done this using sheets of acrylic instead of glass with similar results.


Two colors of blue acrylic paint spread onto glass.  I used glass from cheap photo frames.   If you've done Gelli printing, you'll notice that this technique uses a pretty thick layer of paint, not the brayered thin layer for Gelli printing.


Here is another color combo, sandwiched between two pieces of glass.  I only had these two different sizes, and it was an emergency to try this out, so made do with what I had.  Once the top piece of glass is on, press pretty hard all over the surface to make sure you have good contact contact with the paint .  You will be able to see the pattern begin to emerge in the paint  - so cool.

The hardest part of this is lifting off the top piece of glass without smearing the paint.  You can just see the metal palette blade I used to pry up the top - still a bit tricky.

As soon as you lift off the top piece of glass, you can see the dendritic pattern in the paint.   This branching pattern is everywhere in nature - tree branches, leaf veins, river deltas, neurons, and blood vessels. There's a whole lot of math involved in how this happens that I don't pretend to understand!

So now you have two pieces of glass with patterned paint.  Place paper (I used card stock and some French dictionary pages) on the paint and lightly rub over it to make sure you have good contact.  If you rub too hard, you'll obliterate the pattern.   I was able to get two good prints off each piece of glass. Carefully lift off the paper to see the magic:


Like Gelli printing, it's hard to stop once you start.  Each piece is unique - I love the combination of pattern and white space.   In some I see leaves, others look like corral - so much fun!  These will make great backgrounds.   I used one to make a simple sympathy card:


And couldn't let the paint left on the glass go to waste, so I swiped some tags through for playing with later.


And just like that, another obsession is born.

Friday, January 27, 2017

Canvas Rescue


Finally finished this small canvas.   Like many of my projects, this one ended up far from my original plan.    I started out full of hope - glued down some wooden arrows, including a stir- stick from our stay at the Bellagio, and covered it all with a coat of gesso.

Then things veered off track quickly.  I sprayed on some Dylusions ink , then some Distress inks.  The color wasn't right, so sprayed on some water.   Lesson - all those water-based sprays react with water and the color washes away.   After several spray, blot, spray cycles, I wasn't  happy with the colors/ coverage and the canvas went into Witness Protection.

Last week I brought it out and learned an important lesson - sometimes you just have to plow through the bad stuff.   I dabbed on some acrylic paint, added some white stenciled text  and black paint splatters.  

I glued down some torn pieces of Ideology Melange tissue paper by Tim Holtz .   This paper has a smoother finish than regular tissue paper and doesn't tear easily.   I love the graphic and the transparency that allows base colors to show through.


I tried a new to me technique  using Distress Crayons to make the blue splatters  around the butterfly.     Load a paintbrush with water , and while holding the crayon close to the canvas, flick the brush across the crayon.  This makes finer specks than paint and a fan brush and also allows better control.   I was able to go all around the butterfly , making an outline of blue splatters.  There is the added benefit of some waxy texture along with deep color.


Of course, some projects that go off the rail end up in the trash.  Sometimes nothing can save a disaster, but I'm glad this canvas was a rescue success.

Sunday, January 1, 2017

The Year of the Doodle Finale


This book by Dawn deVries Sokul may just be the best $12.00 I've ever spent.    I met my goal - do something for every day - doodle,  collage, lettering .   Is every one a masterpiece?   Hardly.   Some were so bad I had to totally cover the mess and start over, others rated only a "meh", and a few that turned out better than expected.  I stretched my doodling skills, and realized I need lots more work on lettering.

The binding on this book is nothing short of amazing:


My Year of the Doodle is on the right and started out the same size as Art Doodle Love.  I have collaged, painted, added button edges and generally stressed the binding which is still holding together despite unspeakable odds.


This  over-stuffed book makes me happy whenever I look at its wavy pages, tabs, threads and buttons.


A few last pages to share:


This is an amazing mandala stamp.  The stamp has straight edges, so I continued the design to soften the edges.


I was surprised how many ruler tapes and stickers I found in my stash ! The bird and most of the background on the right is a napkin.


I love using old envelopes.


I've been decluttering my stamp stash and found this cute house stamp I'd forgotten I had.


This was fun - I used a little green tomato to stamp these apples.


December was easy  - used up lots of Christmas bits and pieces from my stash.   I drew the tree with different color Distress Stickles.


The festive birds were salvaged from a card stamped by my friend, Shiela.


Background is from Doodle in French by Anna Corbin - drew on the dress form and added fabric stickers and some rub-ons.  Audrey is the crowning touch!

I'll miss my daily challenge , but luckily I have a brandie-new, pristine Art Doodle Love to start.


Saturday, August 27, 2016

Year of the Doodle Update


It's been a while since I've shared  pages from this great book by Dawn de Vries Sokul.    I'm about 2/3 of the way through and amazed at how well the binding is holding up to all the paint, ink, and bits of ephemera.   I probably shouldn't mention it - maybe it will  boingggg apart while I'm sleeping !

Here is how fat it's become -on the left is a new copy of Ms Sokul's Art Doodle Love and on the right my overstuffed Year of the Doodle that started life as the same size as the one on the left.


We've had a busy summer and I haven't been doing much art work, but it's been fun to work in my book - a small canvas for each day that doesn't take much time to finish.

Doodling is what the book is about - most pages have a prompt and some subtle background color or design, so there's no dreaded white page.   I've been stretching myself to put pen to paper on most days-either as a doodle or lettering,


Some days the prompt just doesn't speak to me, so I go off on my own  as on the 25th,


The Birkenstocks are a big deal.   I've been reading Danny Gregory's book and he keeps saying to draw what you see, not what you think you see.   I had to really study the shoes and force myself to draw what I saw.  Amazingly, the sandals look recognizable!


I also use lots of stamps.  I love the "before my dock rots" one and rarely get to use it.


I love this doll by Traci Stillwell that I cut out of Cloth Paper Scissors  - doesn't she seem perfect for this quote from A Reunion of Ghosts?  (It's a fantastic book, BTW).


Honestly, I can't rave enough about this book - if I'm not working on a day, I'm adding shading or otherwise fiddling with pages I've already done.  So much joy in such a little package!


Normal Title Italic

Follow Me on Pinterest

LinkWithin

Related Posts Plugin for WordPress, Blogger...
 
SITE DESIGN BY DESIGNER BLOGS